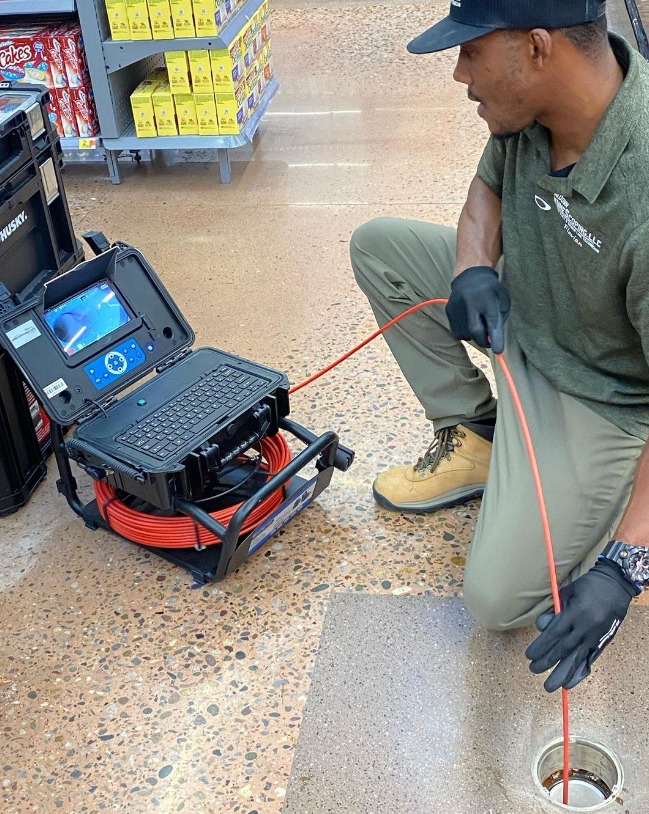
Sewer and drain inspection cameras are an indispensable tool for home inspectors and plumbers. They offer a non-invasive, highly detailed look into the hidden world of pipes and drains, helping to identify potential issues before they escalate into major problems.
However, like any tool, these cameras can encounter their share of technical issues. From image quality difficulties to maneuverability problems or software glitches, a variety of challenges can arise when using inspection cameras. But don’t let these potential hurdles deter you. With a solid understanding of your camera’s operation and a few troubleshooting skills, you can overcome these issues and continue to use your inspection camera effectively and efficiently.
In this blog post, we’ll guide you through some common issues that users of sewer and drain inspection cameras may encounter, and offer practical solutions to resolve them. We’ll also highlight the importance of regular maintenance and care in preventing these issues and extending the lifespan of your camera. And of course, we’ll emphasize the durability and user-friendliness of our line of products, designed to stand up to the rigors of the job and keep working for you.
So let’s dive in and start with the basics – a brief overview of the components of a sewer and drain inspection camera.
The Anatomy of a Sewer and Drain Inspection Camera
Before we delve into the troubleshooting process, it’s essential to understand the components of a sewer and drain inspection camera. This knowledge can give you a better understanding of how the device works, making it easier to identify and resolve potential issues.
Here’s a basic breakdown of an inspection camera’s primary components:
The Camera Head: This is the business end of the device. It houses a high-resolution camera and often includes built-in LED lights to illuminate dark pipes and drains. Some models may also feature a built-in sonde for location tracking.
Push Cable: The camera head is attached to a long, flexible push cable. This cable needs to be durable and flexible enough to navigate the twists and turns of sewer and drain pipes.
Monitor/Display: The live feed from the camera head is displayed on a monitor, allowing you to visually inspect the inside of pipes in real-time. The monitor may also provide controls for various camera functions like LED light brightness, camera orientation, and more.
Control Unit: This houses the controls for the camera, including power, cable reel rotation, and possibly features like digital distance measurement or image capture. It may also contain the power supply or battery pack.
Reel: The reel holds the push cable and camera head when not in use. It may include features like a brake or speed control to assist in deploying and retracting the camera.
Additional Features: Depending on the model, your inspection camera may include additional features such as a built-in keyboard for adding notes, Wi-Fi connectivity for sharing images or videos, or other advanced options.
Now that we have a fundamental understanding of a sewer and drain inspection camera’s components let’s explore some common issues you may encounter and how to solve them.
Common Issue #1: Poor Image Quality
One of the most common issues that users face with sewer and drain inspection cameras is poor image quality. This can be particularly frustrating, as the whole point of using these cameras is to get a clear and detailed view inside the pipes. Here are some potential reasons for poor image quality and ways to address them:
Smudged or Dirty Lens: If your image is blurry or unclear, the first thing to check is the camera lens. In the process of exploring pipes and drains, it’s easy for the lens to become smudged or dirty. Carefully clean the lens with a soft, damp cloth to remove any dirt or grime.
Low-Light Conditions
If your image is dark, you might be dealing with low-light conditions inside the pipe. Many sewer and drain inspection cameras come equipped with built-in LED lights. Ensure these are turned on and adjust the brightness as needed for the best visibility.
Camera Defects
If you’ve cleaned your lens and adjusted your lighting, but your image quality is still poor, you may be dealing with a defect in the camera itself. This could be due to a variety of issues, such as a faulty sensor or a damaged lens. If you suspect a defect, it’s best to consult the manufacturer or a professional for further assistance.
Remember, clear and high-quality images are essential for effective inspections. Proper maintenance and handling of your camera can prevent many image quality issues and ensure you always get the best possible view inside your pipes.
Common Issue #2: Camera Not Turning On
Another common issue faced by users is the camera not turning on. This problem can be particularly frustrating, especially when you’re on the job and need your inspection camera to work. Here are some potential reasons why the camera might not turn on and possible solutions:
Battery Issues
One of the most common reasons a camera won’t turn on is because of battery problems. Check to ensure the battery is fully charged and properly inserted. If the battery is old or has been used extensively, it may no longer hold a charge and need to be replaced.
Connection Problems
Another reason the camera may not turn on is due to connection issues. Ensure all cables and connections are properly secured, including the connection between the camera head, the push cable, and the control unit. Loose or corroded connections can prevent the camera from receiving power.
Internal Defects
If you’ve checked the battery and connections but your camera still isn’t turning on, there could be a defect or damage inside the camera or control unit. This could be due to a variety of factors, such as damage from moisture or wear and tear over time. In this case, it’s best to consult the manufacturer or a professional for further assistance.
A reliable power source and proper connections are essential for your sewer and drain inspection camera to function. Regular checks and maintenance can prevent many power issues and ensure your camera is always ready to go when you need it.
Common Issue #3: Difficulty Maneuvering the Camera
Navigating the intricate twists and turns of a pipe system can sometimes pose a challenge. If you’re finding it difficult to maneuver the inspection camera, here are a few potential reasons and their solutions:
Stiff Push Cable
A stiff or rigid push cable can make it challenging to steer the camera head through bends and turns in the pipes. Make sure the push cable is flexible enough for the job at hand. Over time, the cable may lose some of its flexibility due to wear and tear, so it’s essential to inspect it regularly and replace it if necessary.
Obstructions in the Pipe
Obstructions in the pipe, such as roots, blockages, or accumulated debris, can prevent the camera head from moving smoothly. If you encounter an obstruction, you might need to use a sewer or drain cleaning tool to clear the way before proceeding with the camera inspection.
Camera Head Size
If your camera head is too large for the pipe you’re inspecting, it may have difficulty navigating smaller diameters or tight bends. Ensure you’re using the appropriate size camera head for the pipe’s size and the task at hand.
The ability to smoothly and accurately navigate your inspection camera through a pipe system is crucial for a thorough inspection. Regular maintenance of the push cable and choosing the right camera head can significantly improve your ability to maneuver the camera, making your inspections more efficient and effective.
Common Issue #4: Software Problems
While sewer and drain inspection cameras are largely mechanical devices, they also contain software that controls various functions such as display output, recording capabilities, and additional features. Here are a few common software-related issues you may encounter and how to tackle them:
Display Issues
If the monitor isn’t displaying the video feed from the camera or if the image is distorted, it could be a software issue. First, make sure all connections between the camera, control unit, and monitor are secure. If the problem persists, you may need to reboot the system or perform a factory reset, as per the manufacturer’s instructions.
Trouble Saving Recorded Footage
Most inspection cameras come with the ability to record the inspection for later review. If you’re unable to save or access your recorded footage, make sure you have sufficient storage space available. If the problem continues, it could be a software glitch, and resetting the system or updating the software (if available) could resolve the issue.
Difficulty Using Advanced Features
Some inspection cameras come with advanced features such as on-screen text overlay, distance counters, or Wi-Fi connectivity. If you’re having trouble using these features, refer to the user manual for detailed instructions. Sometimes, a system reboot or software update can fix the issue.
When dealing with software issues, the user manual for your specific inspection camera model is an invaluable resource. It provides detailed instructions on troubleshooting and resolving common software problems. Remember, regular software updates, if available, can also help keep your system running smoothly.
Proper Maintenance and Care for Sewer and Drain Inspection Cameras
Just like any tool, a sewer and drain inspection camera requires regular maintenance and care to function optimally and have a long lifespan. Here are a few key points to remember:
Cleaning the Camera Head: After each inspection, ensure to clean the camera head and lens carefully. This not only ensures clear image quality for your next inspection but also protects the camera head from potential damage due to accumulated dirt or debris.
Caring for the Push Cable: The push cable is subject to a lot of wear and tear. Regularly inspect it for any signs of damage or excessive rigidity. When not in use, make sure it’s properly coiled on the reel, without any kinks or twists.
Battery Maintenance: If your inspection camera is battery-powered, ensure to charge the battery fully before each use. Avoid storing the camera with a dead or low battery as it could impact the battery’s lifespan.
Software Updates: If your camera has software features and updates are available from the manufacturer, ensure to update it regularly. This can fix potential bugs and provide new features that can improve the functionality and user experience.
Storage: When not in use, store the camera in a clean, dry place. Most inspection cameras come with a protective case – use it to protect the camera from dust, moisture, and physical damage.
With proper care and maintenance, your sewer and drain inspection camera can provide reliable service for many years, making it a valuable tool for your business.
When to Seek Professional Help
Despite your best efforts, there might be times when troubleshooting and regular maintenance aren’t enough to resolve issues with your sewer and drain inspection camera. In such cases, it’s best to seek professional help. Here are some scenarios when you should consider consulting a professional:
Persisting Issues: If the issues you’re experiencing persist despite your troubleshooting efforts, it’s a clear sign you need professional help. Continued problems could be a symptom of a more serious internal issue that needs a professional’s attention.
Major Defects or Damage: If your camera has experienced significant physical damage or has major defects such as not powering on at all, a professional repair or replacement might be necessary.
Complex Software Issues: If you’re experiencing complicated software issues that can’t be resolved with a reboot or factory reset, professional assistance can help.
Our products offer robust customer support, ready to assist you whenever you need it. Don’t hesitate to reach out to our support team for advice, guidance, or service. We’re here to ensure you get the most from your sewer and drain inspection camera, helping you deliver the best possible service to your customers.
Conclusion
Sewer and drain inspection cameras are essential tools for home inspectors and plumbers, but like any technology, they can occasionally face challenges. By familiarizing yourself with the common issues outlined in this blog post, you can quickly identify and resolve these problems, minimizing downtime and maintaining the high-quality service you provide to your clients.
Understanding your camera’s components, practicing regular maintenance, and not hesitating to seek professional help when necessary are the keys to ensuring the longevity and optimal performance of your inspection camera. At the end of the day, an efficiently working inspection camera not only saves you time and money but also enhances your credibility with your clients.
We hope this blog post has equipped you with valuable knowledge and tips to keep your sewer and drain inspection camera in top working condition. Happy inspecting!


